In 2009, Bandai release the OVA Animated version of
Harutoshi Fukui novel,
Mobile Suit Gundam Unicorn. This new series continues on the same universal century time line that the original Gundam first began. Among all the new characters and mobile suit that are shown in the first few episodes there is one mobile suit that really stands out from all the rest, the
Kshatriya. A unique mobile suit in its own right, it was the improved model of the NZ-000 Quin Mantha from the ZZ Gundam series. Bandai released the 1/144 scale High Grade version of the
Kshatriya in 2009 and it was one of their most popular kits. When
ishop2go reach me out to ask what kit I should make for them I clearly ask for the
Kshatriya.
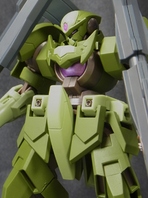
When building the
Kshatriya the first thing that strikes me as WOW is how big in size this kit is. Far large then any normal HG kit it show its presence among larger HG kits like
The O or
Palaces Athens. One of its four binders alone is as tall as the MG Gundam 2.0. The construction of the basic features are easy to build like the Arm, Legs, Head, Torso, and Waist unit however, I decided to add more features to this kit to give it more depth. Using Pla-plate which is made of Styrene I began to detail this kit. This was my first time attempting this on a High Grade kit before but due to its size, I felt more comfortable to try this. Putting on the Pla-plate was easy and I wanted to do this on the main body first before I begin working on the binders.

When I first saw how those binders look like I knew what I wanted to put on the upper and mid section of this part. Since the Neo-Zeon emblem is very familiar to everyone I began making a template using regular paper, with some trimming here and there I was able to get the right shape that will fit in the upper area of the binders. I was not having that much luck with the mid section since it had a steep curve pointing out from the binder. No matter what I try to do to make any type pattern it did not look right to me. At this point I decided to skip this and give it some detail around the binder and after the glue dried on the Pla-plate, it came out perfect.

My build took me about less than 2 weeks to make and six videos to post on YouTube. Yet with all the work I put in, I did not get the chance to paint this kit since the weather is too cold for airbrushing. I will re-visit this kit when spring hits here in the US and then I can begin painting this beast of a kit. For what is worth, I am glad that I got this kit and had the chance to explore some new ideas and possibilities on making a different kind of mobile suit. Many model builders keep asking me if Bandai will ever release a Master Grade version of
Kshatriya. Please note that even if Bandai has the means to make it I really do think they will do this since this scale is prefect enough. For those modelers out these who haven’t consider getting this kit, Please…Stop reading right now and Buy IT!
Stryderprime


